
Laptops look the same for the most part: a sleek, cover that’s usually silver or black with the manufacturer’s logo stamped somewhere in the middle. It’s not too flashy or flamboyant and there’s nothing to really say that the laptop belongs to you. You could buy a laptop cover but those are pretty expensive and we’re all about saving money. Instead, why not try some of these cheap and creative ways to customize your laptop cover? Your unique diy laptop cover will be the envy of your friends!
Who Says Expensive is Better?
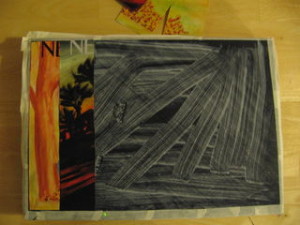
1. Duct/Washi Tape Cover
If you’re a fan of bright colors and patterns and a little short on pocket money, the duct/washi tape cover is the perfect and easy fix for you. It doesn’t really matter which tape you choose but as a recommendation, washi tape peels off easier than duct tape.

https://www.youtube.com/watch?v=2Qg_gwpN8IY&index=10&list=LLgE2bUk-KfIfVVbEzTi1hmQ
What you’ll need:
Laptop
Scissors
Decorative Duct Tape or Washi Tape
Xacto Knife
Ruler
Iron-On Transfer or Sticker (optional)
Double-sided Tape (optional)
Step 1: Prime the laptop
Wipe down the back of the laptop with warm water and soap and then dry it with a towel. This could be a good opportunity to clean the rest of your laptop, i.e screen and keyboard. Make sure the back cover is completely dry before moving to the next step.

http://1mhowto.com/howto/how-to-clean-a-laptop/
Step 2: Cut the tape
Measure how long the laptop cover and then cut the tape according to your measurements. Remember to cut the tape a little longer than what you measured so the tape can wrap around the cover.

http://www.diynetwork.com/how-to/make-and-decorate/decorating/how-to-make-a-headboard-with-duct-tape
Step 3: Taping Down
Start from the bottom and slowly layer on the tape strips. Be careful not to have too much overlap between adjacent tape strips. Also be mindful to press the tape down firmly as you’re layering it on the cover otherwise you’ll get air bubbles. Don’t wrap any of the excess tape onto the computer screen.

http://www.thesweetestoccasion.com/2015/04/diy-iphone-case/
Step 4: Clean up
Use the Xacto knife and carve any excess bits of tape from the hinges, edges and gaps. Don’t cut yourself or the laptop as that would totally ruin your day. Press out any last air bubbles or smooth down errant bits of tape.

http://www.instructables.com/file/FBBD0VJHKBG70PB
Step 5: Optional
Add on the iron-on transfer with the double-sided tape or place stickers in the desired places. This’ll make your laptop look even cuter and add some contrasting colors and shapes. Now step back and admire!

http://www.instructables.com/id/DIY-Laptop-Skin-Easy-Cute-Cheap/?ALLSTEPS
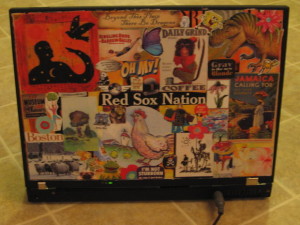
2. Picture-Perfect Cover
It doesn’t have to be only colors and patterns for pictures are just as beautiful! If you have a lot of cool photos (print with regular paper!) or pictures from the internet/magazines, you can customize your cover with an awesome collage!

http://www.instructables.com/id/Make-your-own-notebooklaptop-skin/
What you’ll need:
Sheet of adhesive laminate or vinyl cling
1” Foam Brush
Scissors
Mod-Podge
Small Watercolor Paint Brush (or something similar)
Magazines/Photos
Permanent Marker
Masking Tape
Rotary Cutter and Mat (not essential)
Step 1: Measure and Cut
Measure the dimensions of your laptop cover but allow a ¼” border all around (meaning you take ½” from all four sides). Using the sharpie, mark the dimensions on the laminate sheet and then cut out the corresponding square (use the rotary cutter if you can)

http://www.instructables.com/file/FXHQ4ZUFC2BTUJI
Step 2: Smoothing it down
Put the laminate sheet on top of the laptop cover and center it as best you can. Now, smooth the sheet down and take care to not let any air bubbles form. Work slowly and carefully and once the sheet is on, tape the sides and edges down with masking tape.

http://www.instructables.com/file/FUZQT11FC2BTUJC
Step 3: Securing the images
Cut your images however you want (stripes and dots etc.) and then fit them within the laminate square. Now that you know the layout, paint the laminate with the mod-podge. Once you have placed all the images you want on top of the cover, use the foam brush to gently paint some more mod-podge over the pictures. Squeeze out all air bubbles and don’t be too rough or you’ll rip the pictures.
http://www.instructables.com/file/FM6YC3YFC2BTUJP
Step 4: Layering on images
It’s best to put larger images on the background while putting smaller, and more irregular shapes on the front. Once you’ve finished placing all of your images, paint some thin, even layers of mod-podge over the entire collage.

http://www.instructables.com/file/FX2QX4EFC2BTUJN
Step 5: Finishing up
Don’t remove the masking tape right away! Let the collage dry for about a couple days before peeling away the masking tape. Once it’s finished, sit back and enjoy surfing the internet with your remodeled laptop cover.

http://www.instructables.com/file/FFVRH6GFC2BTUJJ
http://www.instructables.com/file/FPMNHM6FC2BTUKZ
3. Mosaic Cover
This cute, geometrically-oriented cover design is sure to delight those in favor of patterns. It’s easy to do and its minimalistic, shapely design will look suave and sophisticated on any cover!

https://www.youtube.com/watch?list=UUevNJDNNIKmG13YmTqLnZ-A&v=W-MKn3GLGsA
What you’ll need:
Hard computer case (preferably clear)
Spray paint (in whatever color you want)
Glitter Paper
Colorful Gloss Paper
Printed Pictures (on high gloss paper)
Spray Adhesive (Easy Task brand)
UV Resistant gloss coat
Ruler
Scissors
Hexagon Shape Cutter (optional)
Step 1: Spray Paint
First, take the clear, laptop cases and clean them of any dust or fingerprints they might have acquired. Next, spray paint them thoroughly. Do this over a piece of newspaper so you won’t get paint everywhere and upset your parents. For maximum benefit, give the cases at least two layers to make sure the color sticks.

https://www.youtube.com/watch?list=UUevNJDNNIKmG13YmTqLnZ-A&v=W-MKn3GLGsA
Step 2: Cutting up the mosaics
Now, take up all of the paper you have gathered (the glitter and gloss papers as well as photos) and begin cutting them into hexagons. You can do this with regular scissors but you can also use a shape cutter if you wish. Don’t make these hexagons too big, two and a half inches tall at most.

https://www.youtube.com/watch?list=UUevNJDNNIKmG13YmTqLnZ-A&v=W-MKn3GLGsA
Step 3: Lay out your pattern
Before you start to do any gluing, make sure you know what design you want. You can do this by laying the hexagons on top of your laptop cover and getting a visual.

https://www.youtube.com/watch?list=UUevNJDNNIKmG13YmTqLnZ-A&v=W-MKn3GLGsA
Step 4: Gluing Time
Carefully spray the back of the hexagons with Easy Task adhesive spray. Then, place them on the computer cover and press them to make sure they stick. Repeat this step until all of the hexagons have been glued down.

https://www.youtube.com/watch?list=UUevNJDNNIKmG13YmTqLnZ-A&v=W-MKn3GLGsA
Step 5: Sealing the deal
Once your beautiful hexagons have finished drying, spray the cover with UV resistant gloss coat. That should make your art last longer and become more enduring to the elements.

https://www.youtube.com/watch?list=UUevNJDNNIKmG13YmTqLnZ-A&v=W-MKn3GLGsA
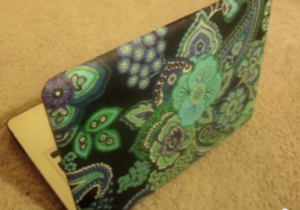
4. Wrapping Paper Cover
Have you ever longed for those laptop cover cases that are covered with sleek and elegant colors and designs? Well, here is your chance to make one for yourself at a fraction of the price!
https://www.youtube.com/watch?v=Tm0Zn7cihsM
What you’ll need:
Wrapping Paper (your choice in color and pattern)
Water
Glue
Bowl
Foam Brush
Laptop Cover (buy a cheap one)
Scissors
Ruler
Step 1: Measuring your case
Use the ruler to take measurements of the laptop case and then cut out the corresponding sheet of wrapping paper. Leave an extra inch for the square meaning you need to leave half an inch of paper on every side.

https://www.youtube.com/watch?v=Tm0Zn7cihsM
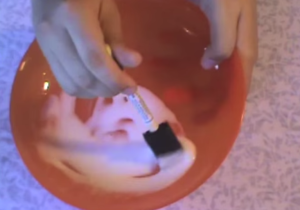
Step 2: Make glue paste
In a bowl, mix together some glue and a little water, ¼ of the bowl should be enough and if you run out, you can always make more! With the foam brush, mix the glue and water together until they reach a light consistency.
https://www.youtube.com/watch?v=Tm0Zn7cihsM
Step 3: Readying the cover
Now take the laptop cover (the one you bought) and cover it with the glue paste. Try to make sure every inch is covered and use even, long strokes. Cover half of the cover with glue and leave the other half dry.

https://www.youtube.com/watch?v=Tm0Zn7cihsM
Step 4: Putting on the wrapping paper
Place the wrapping paper on and make sure the corners are aligned. Press the paper down firmly on the side that has glue and smooth it down as thoroughly as possible. Then, cover the other half of the laptop cover with glue before smoothing down the rest of the wrapping paper.

https://www.youtube.com/watch?v=Tm0Zn7cihsM
Step: Finishing up
Once you’ve finished pasting on the wrapping paper, using the foam brush again, paint a thick layer of paste on the outside of the wrapping paper to give it a hard, and glossy shine. Try to make the layer as smooth as possible so there won’t be uneven ridges. When the layer has dried, cut away any paper bits that stick out.

https://www.youtube.com/watch?v=Tm0Zn7cihsM
Glam Up those Laptops!


![Taylor Swift Songs [Then and Now]](../wp-content/uploads/sites/4/2015/08/seift-300x200-68045d.jpg)

![13 Times Blair Waldorf Was The Best Dressed Girl [Ever]](../wp-content/uploads/sites/4/2015/07/large-138-300x196-68045d.jpg)


![Monday’s [Friday] Quiz: Celebrity Quiz Roundup](../wp-content/uploads/sites/4/2015/06/taylor-swift-300x225-68045d.jpg)


![Morning Routine: How To Wash Your Face Like A Pro [with graphic]](../wp-content/uploads/sites/4/2015/05/YOUR-MORNING-ROUTINE-300x169-68045d.png)


Leave a Comment
Your email address will not be published. Required fields are marked with *